Microsoft's may be getting all the press these days, but many of us are still getting used to the Office 2010 applications, including PowerPoint 2010. Depending on which version of Office you're upgrading from, your PowerPoint 2010 experience will be very different.
If you've been using PowerPoint 2007, you'll find a few small interface tweaks and a number of useful new features in PowerPoint 2010, especially for dealing with multimedia content. If you're upgrading from PowerPoint 2003 or earlier, you'll find an overhauled interface that radically changes how you interact with common features and functions.
Share this story: IT folks, we hope you'll pass this guide on to your users to help them learn the PowerPoint 2010 ropes.
Either way, we've got you covered. This cheat sheet shows newcomers how to get around; it also explores features that are brand new in PowerPoint 2010. We've noted which sections of the story former PowerPoint 2007 users can skip over.
Get acclimated to the new PowerPoint
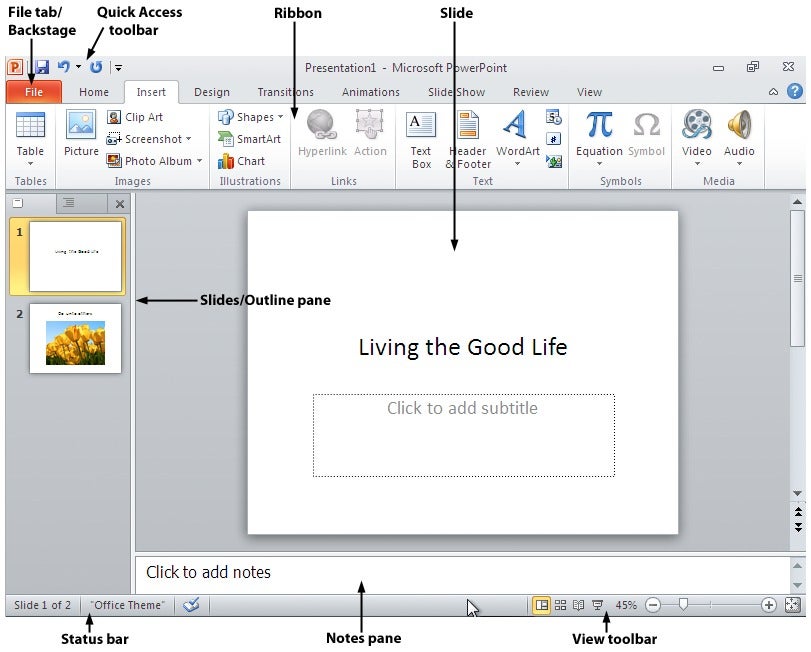
To help you find your way around PowerPoint 2010, here's a quick guided tour of the interface; you can follow along using the screenshot below. With the exception of the File tab/Backstage, it's quite similar to PowerPoint 2007's interface.
 IDG
IDG
Get to know PowerPoint 2010's interface. (Click image to enlarge it.)
The File tab/Backstage. The File tab in PowerPoint 2010 replaces the Office orb button in PowerPoint 2007, which replaced the old File menu found in earlier versions of PowerPoint. Click it, and it leads you to Backstage, a new command center where you can handle an array of tasks, including opening, printing and sharing files; customization; version control and more. As you'll see later in this story, Backstage represents one of the biggest changes in PowerPoint 2010.
The Quick Access toolbar. Introduced in PowerPoint 2007, this mini-toolbar offers buttons for the most commonly used commands, and you can customize it with whatever buttons you like.
The Ribbon. Love it or hate it, the Ribbon is the main way you'll work with PowerPoint. Instead of old-style menus, submenus, sub-submenus and so on, the Ribbon groups small icons for common tasks together in tabs on a big ribbon. For example, when you click the Transitions tab, the Ribbon appears with buttons for items that you can use to create transitions between slides -- Cut, Fade, Wipe, Split and more.
The PowerPoint 2010 Ribbon looks and works much the same as the PowerPoint 2007 Ribbon, with one nifty addition: In PowerPoint 2010, you can customize what's on the Ribbon.
Slide. Here's the heart of PowerPoint -- the slide itself. It's where you'll do all the work of creating your presentation.
Slides/Outline pane. As in earlier versions of PowerPoint, this pane shows all the slides in your presentation. Click the Slides tab in it to see them as thumbnails; click the Outline tab to see just the text of each slide. You can drag the right border of the pane to make it larger or smaller.
Status bar. Here you'll see information about the current slide you're viewing, including what number it is in the presentation and what design theme it's using.
Notes pane. Underneath the slide you'll find a spot where you can type speaker notes. You can drag its top border up or down to make this area larger or smaller. To make it disappear, drag it all the way down. Once it's gone, drag the bottom border of the slide upward to make the Notes pane reappear.
View toolbar. As in PowerPoint 2007, the View toolbar at the bottom right of the screen lets you choose among a variety of views, including Slide Sorter, Reading View and Slide Show. There's also a slider that lets you zoom in or out of your document.
Learn to love the Ribbon
If you're comfortable with the Ribbon interface in PowerPoint 2007, you'll be happy to hear that it's largely the same in PowerPoint 2010, with two new additions: the File tab (also known as Backstage) and the Transitions tab. You can read about the Transitions tab below, then skip directly to the next section of the story, "Find your way around Backstage," where you'll learn, among other things, how to customize the Ribbon -- a feature that wasn't available in PowerPoint 2007.
If the Ribbon is new to you, here's what you need to know. At first, the Ribbon may be offputting, but once you learn to use it, you'll find that it's far easier to use than the old PowerPoint 2003 interface. It does take some getting used to, though.
 IDG
IDG
The Home tab on the PowerPoint 2010 Ribbon. (Click image to enlarge it.)
By default, the Ribbon is divided into nine tabs, with an optional tenth one (Developer). Here's a rundown of the tabs and what each one does:
File (a.k.a. Backstage): As you'll read later in the story, here's where you perform a variety of tasks such as printing, sharing files and more.
Home: This contains the most commonly used PowerPoint features, including creating new slides, changing layouts, formatting text and paragraphs, inserting shapes, performing search and replace operations, and creating drawings.
Insert: As the name implies, this one handles anything you might want to insert into a presentation, such as pictures, clip art, charts, tables, videos, audio clips, equations, photo albums, headers and footers, and text boxes.
Design: Here's where you'll apply different themes to your presentation; change colors, fonts and effects; select background styles; change the slide orientation and page setup; and so on.
Transitions: This tab is new to PowerPoint 2010, although some of its features were controlled by the Animations tab in PowerPoint 2007. It lets you create transitions between slides, such as cuts, fades and wipes, as well as a number of 3D slide transitions that are new to PowerPoint 2010. This tab also lets you preview the transitions and edit some of their effects, such as having the "wipe" transition move in from the right, the left, the top or the bottom.
Animations: This lets you add animation effects to your slides. Don't confuse it with transitions -- transitions are effects between slides, while animations are effects on the slide itself. There are a variety of animations to choose from on this tab, such as wipe, float in, fly out, pulse, bounce and many more. You can preview your animations from here as well.
Slide Show: This tab gives you control over your slideshow as a whole. You can set a slideshow's options, preview the slideshow from the beginning or from the current slide, rehearse and time your narration, record it and more. New to PowerPoint 2010 is the ability to broadcast your slideshow over the Internet.
Review: Here's the place to turn to for checking spelling and grammar, looking up a word in a thesaurus, marking up a presentation with comments and reviewing other people's markups.
View: Go here to change the view, including switching among presentation views (slide master, handout master, notes master, slide sorter and so on); showing or hiding a ruler and gridlines; zooming in and out; choosing from color, grayscale or black and white; and displaying windows split or cascaded. You can also create, edit and use macros from this tab.
Developer: If you write code or create forms and applications for PowerPoint, this is your tab. It's hidden by default. To display it, click the File tab and choose Options --> Customize Ribbon and then check the box next to Developer in the Customize the Ribbon section.
Tab organization
Each tab along the Ribbon is divided into a series of groups that contain related commands for getting something done -- for example, controlling font size, color and other text attributes.
 IDG
IDG
How the Ribbon is organized.
Inside each group is a set of what Microsoft calls command buttons, which carry out commands, display menus and so on. There's also a small diagonal arrow in the bottom-right corner of some groups, which Microsoft calls a dialog box launcher. Click it to display more options related to the group.
Context-sensitive tabs
All that seems simple enough... so it's time to throw a curveball at you. The Ribbon is context-sensitive, changing according to what you're doing. Depending on the task you're engaged in, it sometimes adds more tabs and subtabs. For example, when you insert and highlight a chart, several entirely new tabs appear: Design, Layout and Format, all underneath a Chart Tools supertitle just above the Ribbon.
 IDG
IDG
The Design, Layout and Format tabs under the Chart Tools supertitle appear only when you need them. (Click image to enlarge it.)
Other "now you see them, now you don't" tabs include Drawing Tools, Picture Tools, Table Tools, Video Tools and SmartArt Tools -- all of which appear in response to various actions you take in PowerPoint.
Find your way around Backstage
Backstage is a one-stop shop for doing common tasks such as saving, printing and sharing presentations, broadcasting your presentation, compressing media files embedded in your presentation and more. It brings together a variety of functions that were found in multiple locations in previous versions of PowerPoint and gives access to new features, such as broadcasting a presentation and customizing the Ribbon.
When you click the File tab on the Ribbon, you're sent to the Backstage screen. The Ribbon disappears and is replaced by a series of items down the left-hand side of the screen, most of which are self-explanatory, such as Save, Save As, Open, Close, Recent, New, Print and Help.
 IDG
IDG
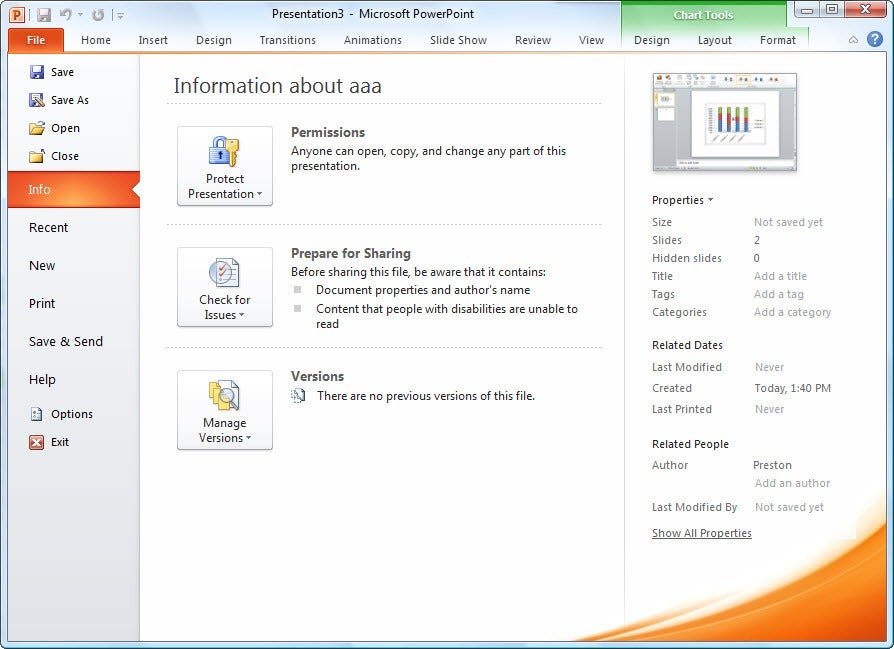
Backstage in PowerPoint 2010 is a one-stop shop for performing a wide variety of tasks. (Click image to enlarge it.)
However, there are three choices that are not so self-explanatory but can be enormously helpful: Info, Save & Send and Options.
Info
On the far right of the screen, Info (see above) shows useful information about the file you're working on, including its size, title, author, number of slides and tags, as well as the last time it was modified and printed, the last person who modified it and similar information.
But finding information about the file is just the start of what you can do when you click the Info button. You can compress any media in the presentation to cut down its file size and to make playback go more quickly. If you have a video in your presentation, a Compress Media button appears on the Info screen. Click it and you can select the level of compression you'd like to apply to the video.
You can also protecting the privacy of your presentation: Click the Protect Presentation button in the Permissions area to encrypt it with a password and to specify who has rights to read and edit the file.
Before sharing the file with anyone, click Check for Issues in the Prepare for Sharing area -- this will let you see if you've left any hidden information or fields in the document, for instance, or if the file is incompatible with earlier versions of PowerPoint.
Click Manage Versions in the Versions area if you would like to see earlier versions of the file that have been auto-saved.
Save & Send
PowerPoint 2010 was built for a world in which documents and their contents are meant to be shared in many ways: via email, in Microsoft's SharePoint collaboration software, in the cloud or broadcast over the Internet. Click Save & Send, and you get options to do all that and more.
 IDG
IDG
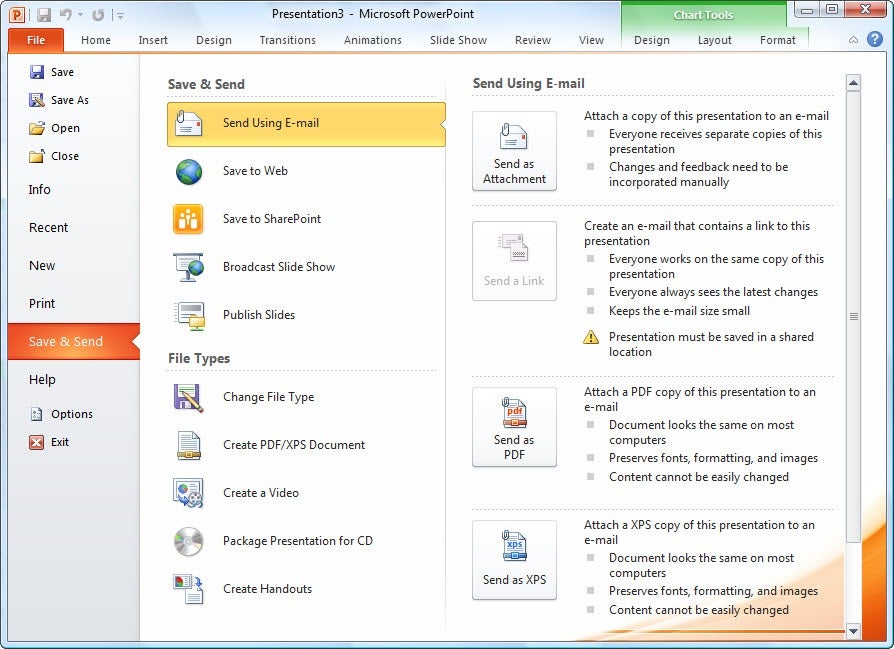
The Save & Send screen in Backstage offers several ways to share your documents with others. (Click image to enlarge it.)
The Send Using E-mail option attaches the current document to a blank outgoing email, using your default mail program. You can send the document in its current format, as a PDF or an XPS (a PDF-like Microsoft format) file or as an Internet fax. If the file is stored in a shared location, you can choose to email a link rather than an attachment.
Save to Web lets you save the file to Windows Live SkyDrive, Microsoft's cloud-based file storage site. Of course, you need to have a SkyDrive account, and you'll be prompted to log in the first time you use this feature. After that, you can save the current file to any of your folders on SkyDrive.
Save to SharePoint lets you save your file to a SharePoint server for sharing with co-workers -- check with your IT department if you don't have your organization's SharePoint access information.
Broadcast Slide Show lets you broadcast your presentation live over the Internet, and you won't need any additional service or infrastructure to do it. (See "New ways to share presentations" later in this article for details about how to do it.)
The Publish Slides option lets you share slides with others by publishing them to a SharePoint site or a shareable slide library.
The File Types area of Save & Send lets you convert the presentation to a PDF or XPS, create a video of it, package it onto a self-running CD, create handouts or change it to a variety of other file types, such as .png, .jpg and a variety of PowerPoint formats.


